If you’re new to RV camping, there’s a good chance this is the part you’ve been quietly worried about. It’s not the drive. Not the campsite. Not even the packing. It’s that moment when you pull in, people are around, and suddenly you’re thinking… am I about to do this wrong?
We recently had a new camper in our group, and his biggest concern wasn’t where to go or what to bring. It was how to hook up an RV sewer hose without making a mess or feeling embarrassed. And honestly, that’s one of the most common fears for beginners.
The good news is this: once you’ve done it a couple of times, it becomes just another part of your routine. This guide will walk you through exactly how to hook up an RV sewer hose step by step so you can feel confident the next time you pull into your site.
What You’re Looking at When You Arrive
Before you even start connecting anything, take a minute to look at your campsite setup. The sewer connection is usually a small opening in the ground, often covered with a cap. It may be threaded or just a smooth opening, depending on the park. Sometimes it will have a rock on top to keep critters out.
Your RV will have an outlet pipe where your sewer hose connects. This is where both your gray and black tanks will eventually drain from, but for now, you’re just focusing on getting everything connected properly.
Understanding what you’re looking at removes a lot of stress. You’re simply connecting your RV to the ground connection in a secure, leak-free way.
Step 1: Position Your RV Before You Start
Before you even think about connecting your hose, make sure your RV is positioned correctly. You want your sewer outlet to be as close to the ground connection as possible without stretching your hose too far.
If the hose has to stretch tight or run uphill, that’s where problems can start. A slight downward slope from your RV to the sewer connection is ideal because it helps everything flow the way it should.
This step alone makes learning how to hook up an RV sewer hose much easier, because a good setup prevents frustration later.
Step 2: Connect the Hose to Your RV First
Start by attaching your sewer hose to your RV outlet. Most hoses twist and lock into place, giving you a secure connection.
Make sure it’s snug. You don’t need to force it, but it should feel firmly attached. A loose connection here is where leaks can happen, and that’s exactly what you’re trying to avoid.
Taking your time on this step builds confidence. You’re setting the foundation for everything else.
Step 3: Secure the Hose to the Ground Connection
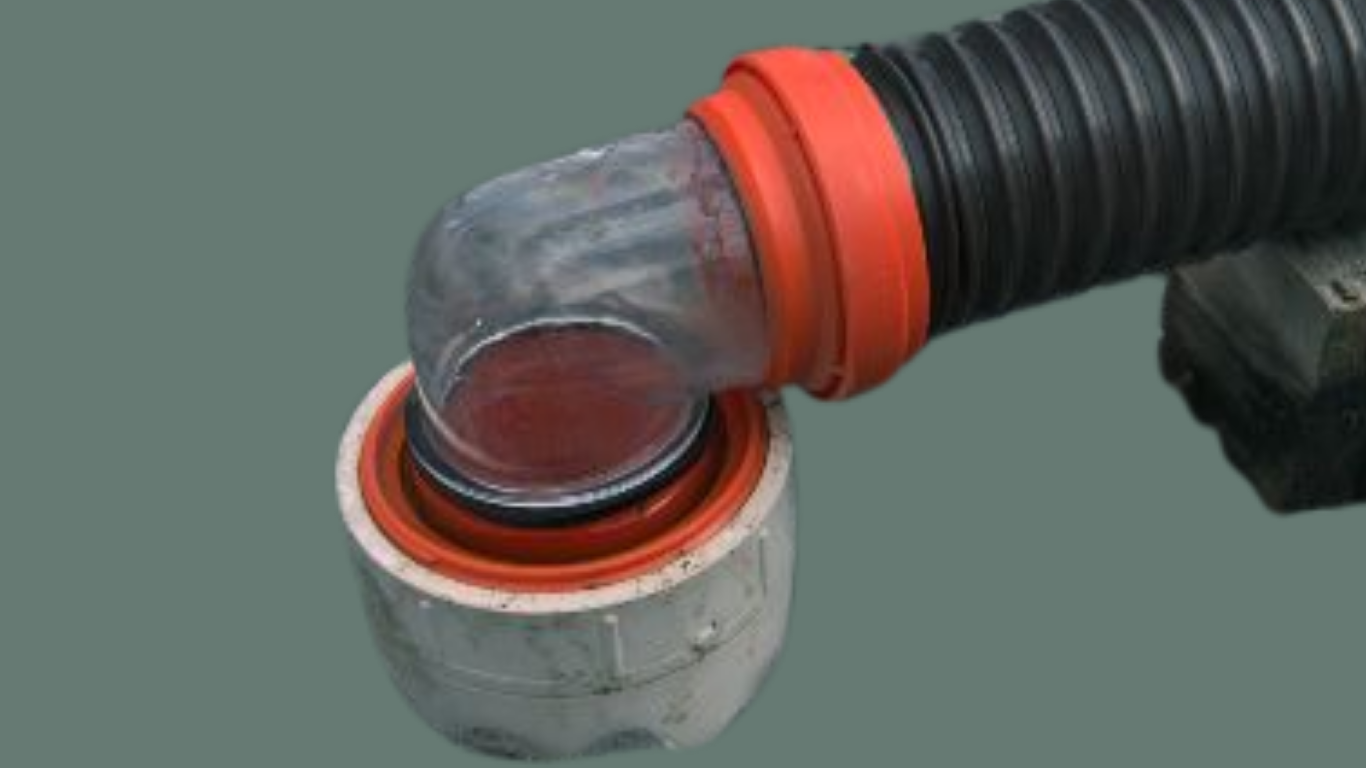
Next, take the other end of your sewer hose and place it into the sewer connection at your campsite. Some sites have threaded connections where you can screw in a fitting. Others may just require you to push the connector into place.
If you have a clear elbow connector, this is where it comes in handy. It helps you see what’s flowing and also creates a more secure fit in many cases.
When learning how to hook up an RV sewer hose, this step is where beginners often feel unsure. Just remember—you’re aiming for a tight, stable connection that won’t move or slip out.
Step 4: Create a Slight Downward Slope
Once both ends are connected, take a look at your hose. Ideally, it should slope gently downward from your RV to the sewer connection.
If your campsite is uneven, you can adjust the hose slightly so there are no major dips or sections where waste could sit (when emptying the tank). A smooth path helps everything drain properly and keeps your system cleaner. If you are using a sewer hose support, also known as a sewer hose ladder, this would be the time to place it under the sewer hose and spread it out so the hose is supported.
This step is simple but important. It’s one of those small details that makes a big difference in how well everything works.
Step 5: Double Check Before You Do Anything Else
Before opening any valves, pause and check your work.
Make sure:
- The hose is securely attached to your RV
- The ground connection is stable
- the hose isn’t twisted or kinked
Even though this process of how to hook up an RV sewer hose is straightforward, this quick check gives you peace of mind. It’s your moment to make sure everything is set up correctly before anything starts flowing.
Common Beginner Mistakes to Avoid
Most mistakes don’t come from not knowing what to do—they come from rushing.
One of the most common issues is not securing the hose tightly enough at either end. Another is setting up the hose without paying attention to the slope, which can lead to poor drainage. This is where using a sewer hose support, a.k.a. a sewer hose ladder, will help with the slope.
Some beginners also feel pressured if people are around and try to rush through the process. The truth is, everyone has been new at some point. Taking an extra minute to do it right is always better than trying to do it fast.
Learning how to hook up an RV sewer hose is really about slowing down and following a simple routine.
How to Feel More Confident Doing This at the Campsite
Confidence comes from understanding what you’re doing, not from doing it perfectly the first time.
If you’re nervous, walk through the steps in your head before you start. Take your time connecting each piece. Don’t worry about who’s watching, because most people aren’t paying attention—and the ones who are have done the exact same thing.
The more you repeat this process, the more natural it becomes. What feels intimidating now will eventually feel routine.
What It Should Look Like When You’re Done
When everything is set up correctly, your sewer hose should be:
- securely connected at both ends
- slightly sloped downward
- free of kinks or sharp bends
Important Note: Keep Your Tanks Closed at the Campsite
This is one of the most important things to understand when learning how to hook up an RV sewer hose, and it’s something many beginners don’t realize right away.
Even when you’re connected to full hookups, your black and gray tank valves should remain closed.
It might seem like it would be easier to just leave them open and let everything drain continuously, but that actually causes problems. The black tank needs to be filled with enough liquid to properly flush waste out when you dump it. If it’s left open, liquids drain away while solids can stay behind, which leads to buildup and odors that are much harder to deal with later. This is also known as the dreaded “poo pyramid,” and it takes a while to eliminate the problem.
Keeping the gray tank closed is just as helpful. When you’re ready to dump, you’ll empty the black tank first, let it drain until nothing else drains out, then open the gray tank. The gray water helps rinse out your sewer hose, leaving it cleaner before you disconnect.
Final Thoughts: You’ve Got This
If you’ve been putting off learning how to hook up an RV sewer hose because it feels overwhelming, you’re not alone. Almost every RVer has had that moment of hesitation.
But once you understand the process and take it step by step, it becomes just another part of your camping routine.
And the next time you pull into a campsite, instead of wondering if you’re going to mess it up, you’ll know exactly what to do.
Recommended Gear for a Clean, Easy Setup
Once you understand how to hook up an RV sewer hose, having the right gear makes the process smoother and a lot less stressful. You don’t need anything complicated, just a few reliable pieces that help everything connect securely and flow the way it should.
A quality sewer hose kit is the foundation. Look for one that feels durable and extends easily without fighting you. A clear elbow connector is another simple add-on that makes a big difference. It lets you see what’s flowing and helps you know when everything has cleared, which adds a level of confidence you don’t realize you need until you have it.
One item that often gets overlooked—but is incredibly helpful—is a sewer hose support, sometimes called a sewer hose ladder. This sits under your hose and creates that gentle downward slope from your RV to the ground connection. Instead of guessing whether your hose is positioned correctly, the support keeps everything aligned and helps prevent waste from sitting in low spots.
Gloves are also a must-have. It’s a small thing, but it makes the whole process feel cleaner and more comfortable, especially when you’re still getting used to handling the setup. As you get more experience with how to hook up an RV sewer hose, you’ll figure out what works best for you, but starting with these basics makes the entire process easier from day one